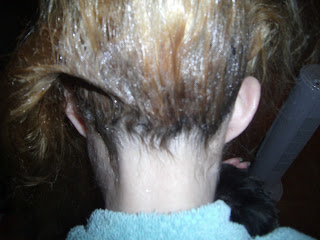
My mom was the model so I could take plenty of pictures for you guys. She and I both dye our hair, but I can't exactly do it myself, so I convinced her to sit still for the pictures. (As long as I didn't show her face.)
 |
| This is a before picture. I apologize that it's sideways but I had to turn the camera to get all of her hair. |
Wrap a towel around your shoulders and hold it there with a hair clip or safety pin. You should also wear an old shirt under the towel, to prevent the hair dye staining anything.
Step Two:
Brush your hair out until there are no knots at all. (If you have curly hair, it helps to straighten it before hand as well.)
Step Three:
Mix the hair dye according to the instructions that come with it. Make sure you wear gloves.
 |
| Yes, that is my kitchen sink, with a Sprite can rinsing out. |
Use the part you usually use (whether in the middle or to the side) and begin applying the dye. Start at the hairline and move towards the back of the head, applying enough dye to cover the roots.
Step Five:
Repeat this process, going thin layer by thin layer, until both sides of the head are covered in dye. Use a rat-tailed comb to keep the layers as even as possible.
 |
| It should look something like this, when you finish Step Five. |
Once you have dyed all of the hair on both sides of the head, flip the hair over. Be careful not to get dye on your face, and especially your eyes. If you get dye in your eyes, please flush them with water for at least 15 minutes and follow any other instructions that come with the hair dye.
Step Seven:
Apply hair dye to the hair line around the neck, until the roots are covered. I go from left to right, but it doesn't matter which way you start.
Step Eight:
Go thin layer by thin layer, applying enough dye to cover the roots, going upwards towards the top of the head. Again, it works best if you use a rat-tailed comb. It's not as easy to keep these layers even, but try your best.
Step Nine:
Once you have completely dyed all of the back, flip the hair back. Use a wide-tooth comb to comb the hair throughly from roots to end.
Step Ten:
Begin applying the dye to the rest of the hair, starting at the bottom layer and covering each layer in dye.
 |
| When you're done, it should look something like this. |
Again, comb your hair with a wide-tooth comb.
Step Twelve:
Leave the hair dye on as long as the instructions say. Do not leave the dye on longer than instructed. Also, keep an eye on the color. You may not have to leave it on for the full time, if your hair is taking the color easily.
Step Thirteen:
Rinse your hair with water. Make sure that absolutely no hair dye is left in your hair.
Step Thirteen B:
Almost always, conditioner comes with the hair dye. Leave the conditioner on as instructed, before rinsing that off as well.
Step Fourteen:
Wrap your hair in a towel and wait for it to dry naturally. Don't use any heat to style your hair, unless you absolutely have to.
Things to Remember:
-Don't put your hair up or style it with heat unless you absolutely have to, for the next forty-eight hours. From personal experience, that will fuck up the way the dye sits in your hair.
-It also helps to not wash it for twenty-four hours.
-No swimming for at least a week.
-Be generous with conditioner, to keep your hair in good condition.
-Follow the instructions on the package, for the sake of your hair and my sanity.
-Everyone is different, so it may actually take more than one bottle of hair dye. It takes one for me and two for Mom. Make sure you have enough.
Now, I bet you guys want to see the finished product?
How's it look?


No comments:
Post a Comment